- Painless Cooking
- Bread
- Wild Yeast
How to Make a Wild Yeast Starter
Most people knew how to make a wild yeast starter during the eighteenth and nineteen centuries. This starter provided bakers with a source to make all kinds of breads. Before people realized how to process and control yeast cultures, they knew they could pull wild yeast out of the air. They found that this wild yeast made all their sourdough biscuits, pancakes and breads much lighter. The taste and texture of each recipe was also great.

Early pioneers in America learned how important it was to learn how to make a wild yeast starter. This provided a valuable source of nourishment for early settlers. All wagon trains traveling west carried a starter with it providing a way to make all kinds of breads along the trail. When the wagon train made camp for the night, the cook would generally take enough of the starter out for the evening meal and also for biscuits in the morning. After removing what was needed, it was replenished with more flour and water.
The same story is often heard about our early miners. They also learned how to make a wild yeast starter. Sometimes they worked at the mines for weeks or even months without returning home, if they had another home. A starter was kept going to provide a way to make food to eat. Again, as with the wagon train, the starter had to be “fed” after using a portion to keep it alive.
Along the trails which the wagon trains traveled and around these old mines, signs of wild yeast sourdough were left behind. Among these was the typical pan which carried the sourdough starter. Even in recent decades some have been found and were shown on television. Most were old fashioned dish pans made out of porcelain. The material of the container is important; you do not want any aluminum. A glass or crock is suitable or stainless steel.
I wanted to learn how to make a wild yeast starter because I did not want to depend on purchased yeast. It does go stale making it useless. There also may be a time when I cannot get to a store to purchase yeast. I wanted to see how this wild yeast works without needed any yeast at all. It is complex as far as time consuming but I really enjoyed making this bread. I was also very pleased with the results. Because of all the steps required, I want to walk you through the process step by step. You can make the starter with milk or water. I like it with the milk but if necessary, I have no problem making it with water.
When I was first learning how to make wild yeast starter, I was really amazed at the history of this. Many of our traditional foods have a long history but this is so interesting. One thing I found so unbelievable is that many of these starter have lasted for many years. The oldest one I have heard about is in California and I believe I read that it is over 100 years old. Can you believe?
HOW TO MAKE A WILD YEAST STARTER
DAY ONE: Place 2 cups of milk in a container (glass, crock, stainless steel; no aluminum); let set on counter top for 24 hours.
 Day One 2 Cups of Milk Left Out on Counter Top
DAY TWO: Add 2 cups of flour into the milk; stir until well blended. Cover tightly with 2 layers of cheesecloth; tie with string, tape, etc. to keep it tight. Place outside in warm weather. Placing is IMPORTANT to keep it clean and free of bugs. Do not place it on the ground, under trees or in the hot sun. It gathers more yeast if it is placed in the open where air circulates around it. I found it does not work as well if inside a screened in porch or where the porch has solid walls on the ends. I placed mine on a high uncovered porch on a table. I attach a large umbrella over it to add shade. Let the mixture set in this spot about 7 to 8 hours checking on it occasionally.
 Day Two Add Flour
 Cover Tightly with Cheesecloth
 Set Outside 7 to 8 Hours
BRING STARTER INTO KITCHEN COUNTER: Remove cover from your container. Let it stand on your counter top for 2 to 5 days. It will get thick and will get a strong SOUR SMELL. If it begins to dry out, stir in a little water. From 2 or five days, it will start to bubble. Now you can mix up the bread.
 Remove Cover and Stand Inside for 2 to Five Days Until Yeast Bubbles
PLACE 4 cups of flour in a large mixing bowl; add 2 teaspoons sugar, 1 teaspoon salt, ½ teaspoon baking soda and 1 tablespoon melted butter.
ADD 2 cups of the starter and 1 cup warm water (112F degrees); stir to blend.
TURN dough out onto floured surface; knead until smooth and elastic adding more flour until stickiness is gone.
PLACE dough in a greased bowl turning to coat; cover with plastic wrap and a towel.
SET bowl in a warm place to rise for 2 hours. (I set it near or on my stove with the oven on; probably about 80F degrees).
NOTE: After 2 hours, it still does not look like it has risen to double.
PUNCH dough down and shape into a round loaf; place on a greased baking tray.
LET rise again for 2-3 hours in warm place (This time depends on your temperature).
PREHEAT oven to 350F degrees; brush loaf lightly with water.
NOTE: This bread does not need to be brushed with water because the crust is hard without it; the water makes it harder.
WITH a sharp knife cut 4 slashes in the top of loaf (2 one direction and 2 the other crossing the slashes).
BAKE about 40 to 45 minutes until loaf is golden brown.
BLUEBERRY PANCAKE RECIPE
When you learn how to make a wild yeast starter you can use it to make pancakes.
- 2 Cups flour
- 1/8 Teaspoon salt
- 1 Tablespoon baking soda
- 1/2 Cup sugar
- 2 Beaten eggs
- 3 Tablespoons melted fat
- 1 Cup sourdough starter
- Milk
- 1 Cup fresh blueberries (Wash, drain and dry)
In a large bowl combine flour, salt, soda and sugar.
Add to the bowl the starter, beaten eggs and melted fat.
Stir in enough milk to make a smooth batter; stir in blueberries.
Pour enough batter onto griddle (or skillet) to make your pancakes. (I usually use ¼ to 1/3 cup of batter.)
Cook until first side seems to firm up and bottom gets light brown; turn over and cook other side.
Serve with syrup; serves 6.
SOUTHERN CORNBREAD RECIPE
When you learn how to make a wild yeast starter you can use it to make cornbread.
- 1 ½ Cups yellow cornmeal
- 1 ½ Cups flour
- ½ Teaspoon salt
- 1 Tablespoon sugar
- ½ Teaspoon baking soda
- 1 Beaten egg
- ½ Cup melted shortening
- 1 Cup sourdough starter
- 3/4 Cup milk
Preheat oven to 425F degrees; grease 9X9 inch square pan (or equivalent).
Combine cornmeal, flour, salt, sugar and baking soda.
Add egg, shortening and sourdough starter.
Stir in milk; pour into prepared pan.
Bake 25 to 30 minutes or until pick comes out clean.
COUNTRY BISCUIT RECIPE
When you learn how to make a wild yeast starter you can use it to make biscuits.
- 5 Cups flour
- 1 Teaspoon baking soda
- 1 Teaspoon salt
- 3 Tablespoons sugar
- ¾ Cup solid shortening
- 1 Cup sourdough starter
- About 1 ¾ Cups warm milk (112F degrees)
Combine in a mixing bowl flour, soda, salt and sugar; cut in shortening until crumbly.
Add wild yeast sourdough starter; stir in enough warm milk to make a soft dough.
Turn dough out onto a floured surface; knead just until smooth.
Roll dough out to ½ inch thickness; cut with a round biscuit cutter.
Place biscuits on a greased baking sheet; set in warm place while oven is heating.
PREHEAT OVEN TO 400F degrees; bake until golden brown 20 to 25 minutes.
Sign Up for My Monthly Newsletter to Learn More Great Tips!
Plus Receive a free guide "Cooking for a Crowd"!
What's Cooking
-
How to Make Chocolate doughnuts
Jul 02, 25 07:44 AM
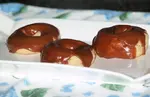 Try one of these recipes for chocolate doughnuts like baked yeast with chocolate glaze, Indian fried bread, easy donuts or beignets.
 -
How to Cook Greek Food
Mar 19, 25 08:21 AM
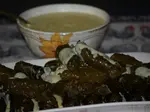 Learn how to cook Greek food like olive balls, salad, fried cheese, stuffed grape leaves, lamb stew, cheese filled triangles, endive with lemon sauce, pita bread and honey walnut balls.
 -
How to Make a Crusty Bread Recipe
Mar 19, 25 08:08 AM
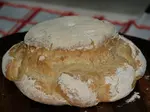 Learn how to make a crusty bread recipe for fennel, mushroom, Irish oat, honey wheat, country, raisin wheat, old fashioned cottage, French, onion and Crusty hard rolls.
 -
How to Make Irish Cakes
Mar 19, 25 07:55 AM
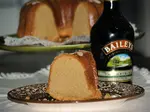 Select one of these delicious Irish cakes like the green Waldorf Astoria cake, rhubarb custard cake, lime Jello cake, apple coffee cake and Irish cream pound cake.
 -
How to Make Meatloaf
Mar 01, 25 01:50 PM
 Learn how to make meatloaf with recipes for variations of a basic loaf, Italian seasoned, sweet and sour or try a turkey loaf.
About Me | Contact Me | Privacy Policy/DISCLAIMER | What's New!
By Frances Peffly Moore © Copyright 2009-2026 painlesscooking.com